
Should I Encapsulate My Crawl Space? What to Know First
You probably didn’t wake up excited to think about your crawl space. More likely, you noticed a musty odor, damp insulation, cold floors, standing water, or signs of mold and started wondering what’s happening beneath your home. If you’re dealing with these things, crawl space encapsulation may be one of the smartest ways to protect your home from bigger issues down the road.
Many homeowners start looking into crawl space encapsulation after noticing warning signs they can see, smell, or feel. These issues can be easy to ignore because the crawl space is usually out of sight. Unfortunately, out of sight does not mean harmless.
Crawl space encapsulation can help create a cleaner, drier, more controlled environment beneath your home by reducing ground moisture and uncontrolled air movement. But before encapsulating a crawl space, it’s important to understand whether there are active crawl space moisture problems that need to be addressed first.
A professional inspection can help determine whether encapsulation is the right solution or whether your crawl space needs drainage, waterproofing, insulation, mold cleanup, or foundation repairs before it is sealed.
Key Takeaways
- Crawl space encapsulation helps separate your home from ground moisture, outside air, and uncontrolled humidity.
- The biggest crawl space encapsulation benefits include better moisture control, reduced mold risk, improved comfort, and a cleaner space beneath the home.
- Crawl space moisture problems should be addressed before encapsulation so water intrusion is not trapped inside the sealed area.
- Crawl space mold is usually a symptom of excess moisture, so the source of the moisture needs to be identified before the space is sealed.
- Encapsulating a crawl space is most effective when it is part of a complete moisture-control plan that may include drainage, vapor barriers, insulation, dehumidification, or foundation repair.
- A professional inspection can help determine whether crawl space encapsulation is the right solution or whether another repair should come first.
What Is Crawl Space Encapsulation?
So, what is crawl space encapsulation? Simply put, crawl space encapsulation is the process of sealing the crawl space to help control moisture, humidity, air movement, and temperature swings beneath the home.
Most encapsulation projects involve installing a heavy-duty vapor barrier along the crawl space floor. Depending on the condition of the space, the process may also include sealing walls, piers, seams, vents, rim joists, and other openings where outside air or moisture can enter. In some cases, insulation, drainage improvements, or humidity control may also be recommended.
The goal is not just to “cover the dirt” in the crawl space. A thin sheet of plastic laid over the ground may look like a solution, but true encapsulation is more complete than that. It is designed to create a cleaner, drier, more controlled environment beneath the home so moisture is less likely to affect the structure, indoor comfort, and air quality.
That said, encapsulation works best when the entire crawl space system is evaluated first. If water is entering through a foundation crack, poor drainage, or grading issues outside the home, sealing the crawl space without addressing the root cause may not solve the problem. Instead, it may only hide it for a while, which is not the kind of surprise anyone wants.
Common Crawl Space Moisture Problems, Mold, and Warning Signs to Watch For
Crawl space moisture problems often start small, but they can lead to crawl space mold, musty odors, wood damage, poor comfort, and larger home repair concerns over time.
Moisture can enter a crawl space in several ways. It may come up from exposed soil, seep through foundation walls, enter through cracks, move in with outside air, or collect due to poor drainage around the home. Plumbing leaks can also contribute to moisture problems, especially if the issue goes unnoticed for a while.
Some signs are obvious: standing water, muddy soil, damp insulation, condensation on pipes or ducts, and visible mold. Other signs are easier to miss. Musty smells inside the home, high indoor humidity, uneven temperatures, cold floors, and increased pest activity can all point to excess moisture beneath the house.
Crawl space mold is usually a sign that moisture or humidity is present and needs to be corrected before the problem spreads or returns. Mold can appear on wood framing, insulation, stored materials, and other organic surfaces in the crawl space. While encapsulation can help reduce the damp conditions that allow mold to grow, existing mold will likely need to be addressed before the space is sealed.
Don’t miss this part. Crawl space encapsulation should be part of a larger moisture-control strategy, not a standalone mold-removal solution. If the underlying water issue remains, mold and moisture problems will just come back. A complete approach may involve waterproofing, insulation, drainage, sump pump installation, foundation repair, or other improvements, depending on what the inspection finds.
Crawl Space Encapsulation Benefits for Your Home
The most important crawl space encapsulation benefits are the result of creating a cleaner, drier, more controlled environment beneath your home.
One of the biggest benefits is moisture control. Encapsulation helps reduce ground moisture from entering the crawl space, especially when a durable vapor barrier is properly installed and sealed. By limiting moisture, the crawl space becomes less vulnerable to mildew, wood rot, musty odors, and mold growth, as we mentioned.
Encapsulation may also improve comfort in the rooms above the crawl space. If your floors feel cold, drafty, or uneven from room to room, your crawl space may be part of the problem. A sealed and insulated crawl space can help reduce air leaks and temperature swings, making the home feel more consistent throughout the year.
Energy efficiency may also be improved by crawl space encapsulation. When outside air and humidity move freely through a crawl space, your heating and cooling systems may have to work harder to keep the home comfortable. This can be especially true if ducts, pipes, or mechanical systems run through the crawl space itself. Sealing and insulating the area can help reduce some of that strain.
Another benefit is cleaner access. No one is asking you to spend your weekends hanging out in the crawl space. But if someone needs to inspect plumbing, HVAC, electrical, insulation, or foundation components, an encapsulated crawl space is typically cleaner and easier to navigate than one with exposed soil, damp insulation, and debris.
Encapsulation may also help reduce conditions that attract pests. It is not a guaranteed pest-control solution, but damp, dark, unsealed crawl spaces can create attractive conditions for insects, rodents, and other unwanted guests. Reducing moisture and sealing access points can make the space less inviting for those creepy crawlers.
When Should I Encapsulate My Crawl Space?
If you think it might be time to encapsulate your crawl space, start by looking for signs that moisture, humidity, or poor insulation are already affecting the area.
You should consider encapsulation if your crawl space has a dirt floor, exposed soil, or recurring dampness. These conditions make it easier for ground moisture to enter the space and affect the rest of the home. If your crawl space smells musty, has visible condensation, or feels humid when you enter, those are also signs that encapsulation may be worth considering.
Musty odors inside the home can be another red flag. Because air from the crawl space can move upward into the living area, smells from beneath the home may not stay contained. If the crawl space is damp, moldy, or poorly insulated, the effects can show up in the rooms above it.
Stronger indicators include crawl space mold, sagging insulation, condensation on surfaces, soft or damaged wood, and visible signs of wood rot. These issues suggest the crawl space is more than a small issue. At this point, it may already be affecting the structure or performance of the home.
Encapsulation can also be a preventative upgrade. Some homeowners choose encapsulation before major damage appears because they want to protect the home from future moisture issues. That can be especially helpful if your property is vulnerable to seasonal humidity, heavy rain, poor drainage, or exposed soil.
No matter what, an inspection is the best way to confirm whether encapsulation is the right solution for you. A professional can determine whether the crawl space is a good candidate for encapsulation or whether other repairs should happen first.
When Encapsulating a Crawl Space May Not Be the First Step
If you’re experiencing certain issues, it may be best to hold off on encapsulation until they have been addressed. Encapsulating a crawl space works best after active water intrusion, drainage problems, mold, or structural concerns have been identified and addressed.
Encapsulation should not be used to cover up standing water or active leaks. If water is entering the crawl space during heavy rain, through foundation cracks, or because of poor drainage, those issues need to be corrected first. Otherwise, you could end up sealing moisture inside the space instead of keeping it out.
Drainage problems, foundation cracks, and poor grading around the home may all need attention before encapsulation begins. In some cases, a sump pump, drain tile, exterior grading improvements, or foundation crack repair may be needed to manage water properly.
If the crawl space has existing mold, cleaning or remediation may be necessary before the space is sealed. The same goes for damaged wood, rotting framing, or severely compromised insulation. Those materials should be evaluated so the encapsulation system is installed over a sound, prepared space.
The point is, the right order of repairs matters. A good contractor should not simply seal the space and call it a day. Look for a partner that will evaluate the crawl space as part of the larger home system, including waterproofing, foundation conditions, insulation, drainage, and moisture control.
How the Crawl Space Encapsulation Process Typically Works
The crawl space encapsulation process usually starts with a careful inspection and then moves through preparation, moisture correction, sealing, insulation, and humidity control.
- First, the crawl space should be inspected for major issues such as water intrusion, crawl space mold, damaged insulation, and structural concerns. This step helps determine whether encapsulation is appropriate and what needs to happen beforehand.
- If active water problems are present, those should be addressed before the crawl space is sealed.
- The area is prepared. Debris, damaged materials, and wet or sagging insulation may need to be removed.
- A durable vapor barrier is installed across the crawl space floor. This may be extended up walls or around piers, depending on the design of the space. This helps separate the crawl space from ground moisture.
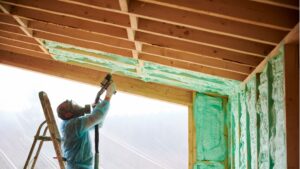
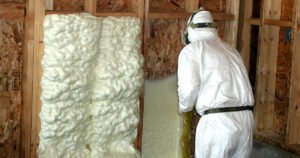
- Walls, piers, vents, rim joists, and air gaps may also be sealed where appropriate. Insulation may be added or improved to help with comfort and energy efficiency. In some crawl spaces, dehumidification or ongoing humidity control may be recommended to maintain the right conditions after encapsulation.
Keep these steps in mind, but remember: The exact process depends on the home. That’s why inspection from a trusted contractor matters.
How Much Does Crawl Space Encapsulation Cost?
The cost of crawl space encapsulation depends on the size, condition, accessibility, and moisture-control needs of the crawl space.
Pricing varies because no two crawl spaces are the same. A small, dry, easy-to-access crawl space with minimal prep work will have a very different scope than a larger crawl space with standing water, mold, damaged insulation, drainage issues, or limited access.
Common cost factors include square footage, crawl space height, debris removal, vapor barrier quality, existing moisture, mold concerns, and the condition of insulation. If the project also requires drainage improvements, sump pump installation, foundation crack repair, insulation upgrades, or a dehumidifier, those items can affect the total cost.
If you’re trying to decide if it’s worth the money, the investment should be evaluated in terms of long-term protection, comfort, and prevention of more expensive moisture-related damage. In other words, the question should not only be, “What does encapsulation cost?” but also, “What could ongoing crawl space moisture problems cost if they are ignored?” Wood rot, mold, damaged insulation, poor comfort, and foundation-related issues can become more expensive over time.
So, Should You Encapsulate Your Crawl Space?
If moisture, humidity, mold, odors, or poor insulation are affecting the space beneath your home, crawl space encapsulation may be a smart solution. No matter what, the best answer starts with a professional inspection.
A dry, clean, well-insulated crawl space may not need immediate encapsulation, though it may still benefit from preventative protection. A damp, musty, mold-prone, or poorly insulated crawl space is a stronger candidate for encapsulation, especially if the issues are affecting comfort, air quality, or the condition of the home.
If you’re looking for that trusted partner to help you take the first step, Zander Solutions can inspect your crawl space, identify what is causing the issue, and recommend the right combination of solutions for your home.